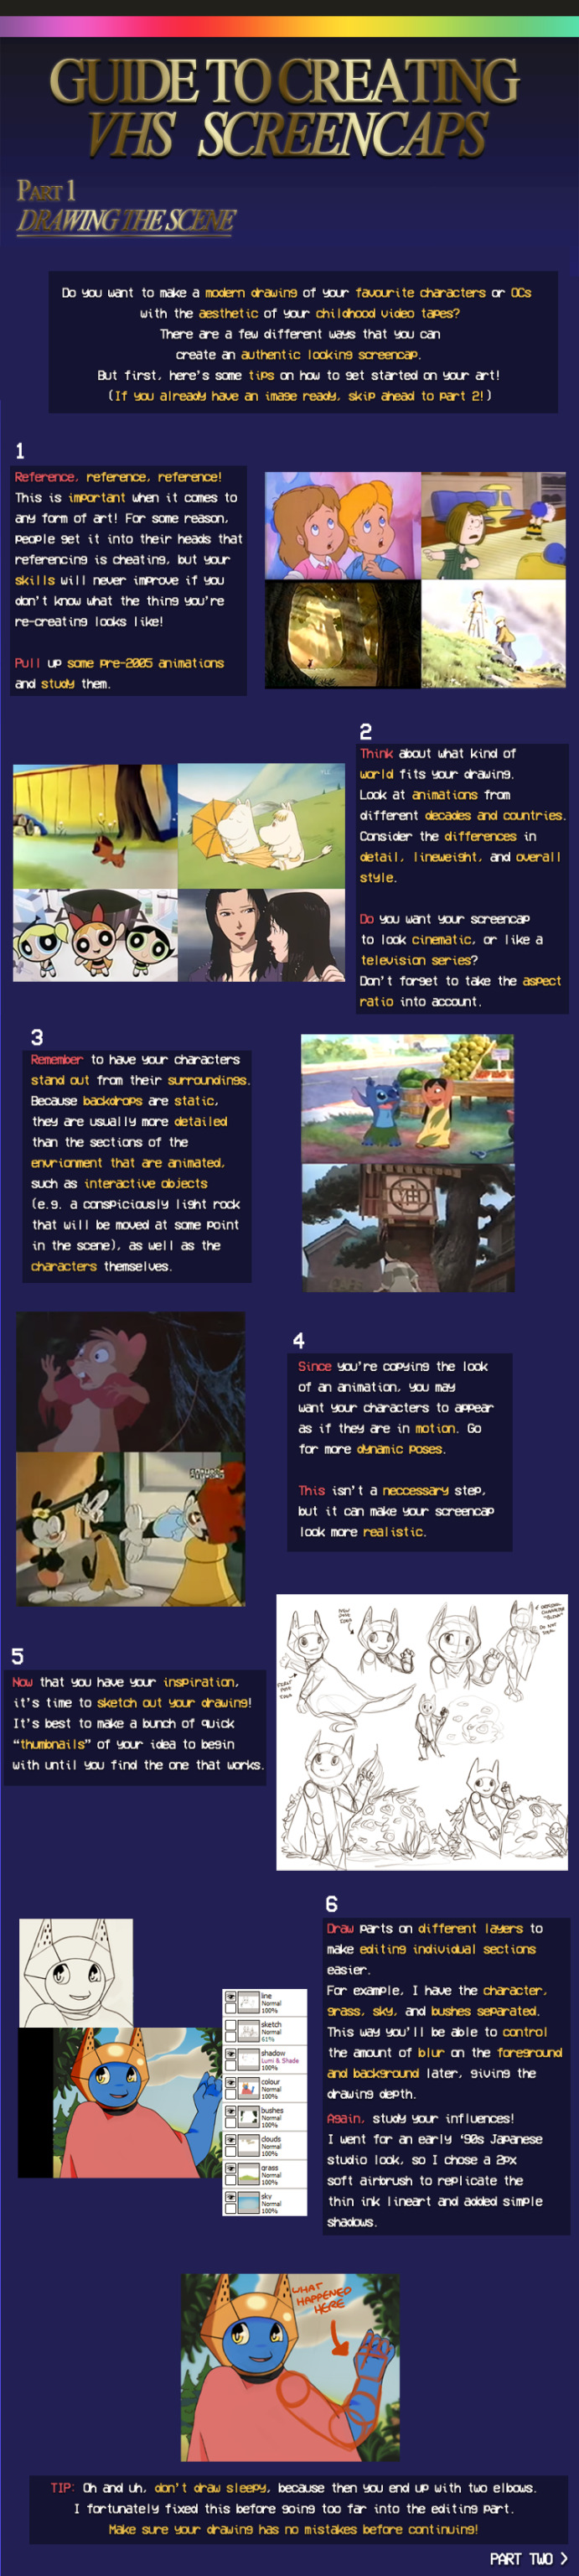
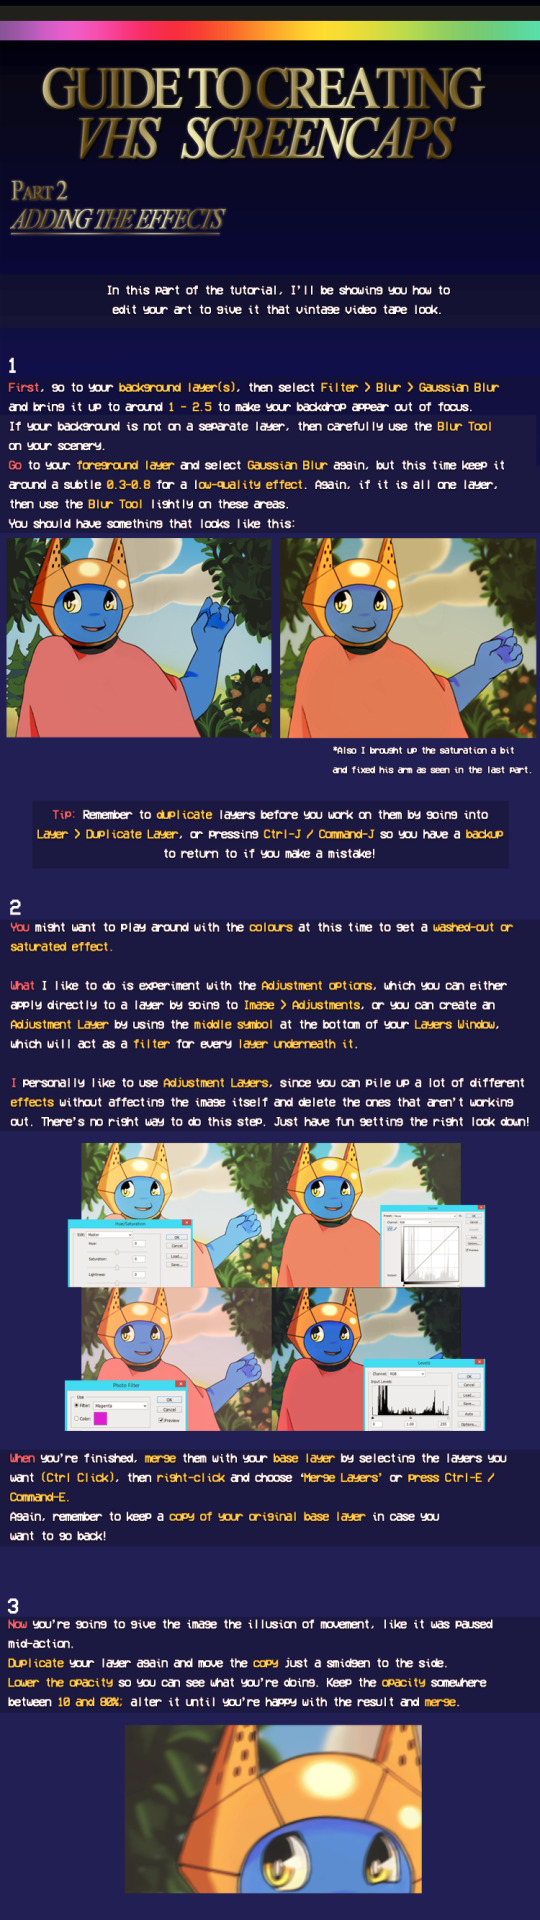
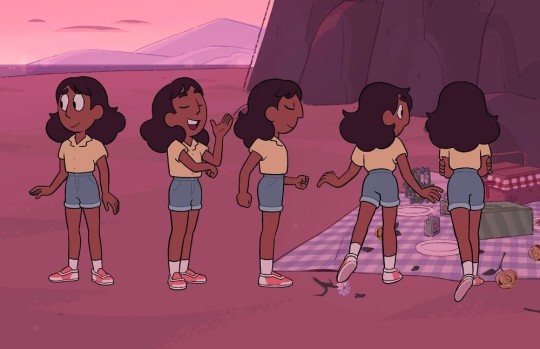
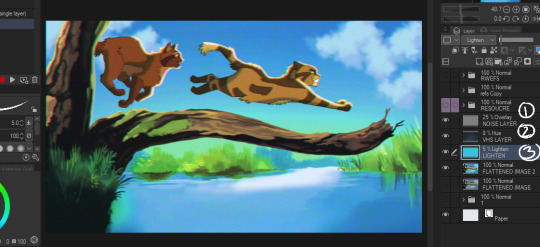
#Fake Screenshot Tutorial
Explore tagged Tumblr posts
Visit Tumblr Blog
Explore Tumblr blogs with no restrictions, modern design and the best experience.
Last Seen Tumblr Blogs


Fun Fact
There were a total of 171.5 billion posts on Tumblr in 2019.
Text
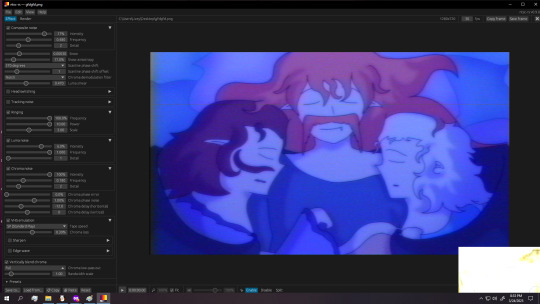
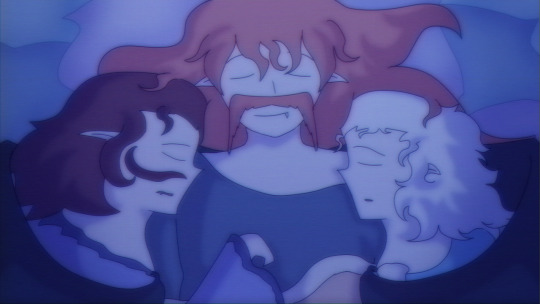
By Kea2lie on DeviantArt
#Tutorials & References#Art Tutorial#Fake Screenshot Tutorial#Fake Screencap Tutorial#VHS Tutorial#not my art#If the original artist wants me to take this down I will
132 notes
·
View notes
Text
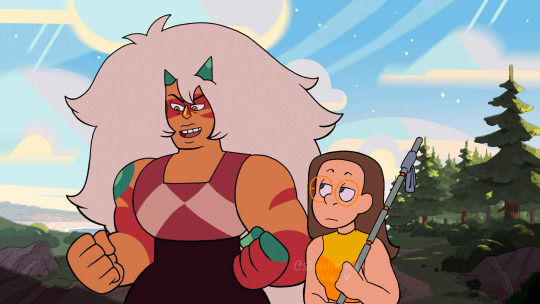
I had someone DM me recently asking for tips for creating an SU sona and drawing in the style, which is one of my favorite topics to think about and discuss!! I'm definitely not the end-all-be-all of SU style replication and have so much to learn, but I wanted to share my method for anyone interested in creating SU art! So here's a Steven Universe Style Replication guide!
Before you start:
Gather LOTS of references. references EVERYWHERE. I have a google drive folder specifically for Jasper references, but I plan on having folders for each character as well. If you know you're going to draw a specific character a lot, gather references!!!
also, gather references of characters you base your S/I on physically. my sona has traits from both Steven and Connie's body types, so I used photos from their references when creating mine - I specifically used Connie's turnaround as inspiration for the height/posing of mine!
((you don’t HAVE to create a turnaround ofc, but thinking of your sona as one that needs to “follow the rules” of the other characters’ designs can help creating something that looks proportional and accurate!))
Colorwise, it’s fun to consider your f/o or the characters you interact with before creating an outfit palette -> I specifically use yellow as a base color because of the way it meshes with Jasper’s orange pallet, as well as being complementary to Steven’s pink and Connie’s blue
Drawing:
SU has the benefit (and curse) of inconsistent style and size references. it's partially proportions to the other characters, yea, but it's more in the shape language you use when drawing in the style, which is why references are so helpful!

(unrelated but I love how this shows how much I still struggle drawing jasper.... even after six months straight of exclusively drawing her. sigh.)
take these drawings I threw together! these are four completely different characters, but they all feel different because of the shape language used:
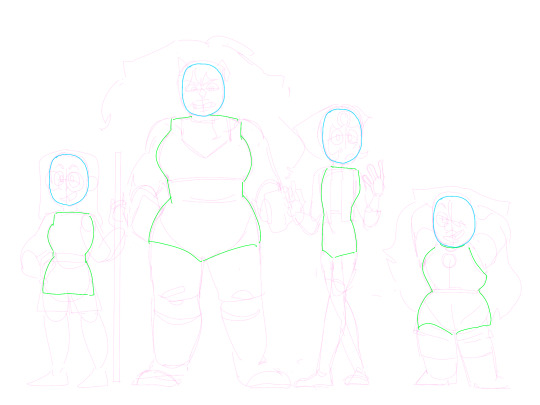
even with my own style bleeding in, really focusing in on what their core body is expressing is what demonstrates the character.
this translates to creating your own sona, too - think about how your sona would fall into the shape language. my sona is similar to Connie, but a bit curvier and stockier, which shows especially in the core of the character design!
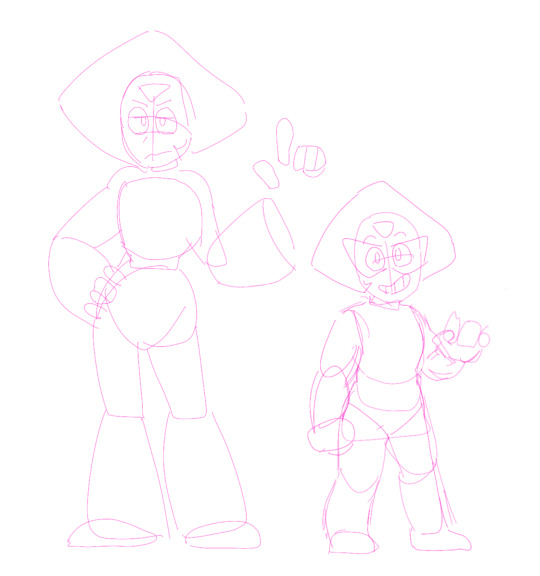
I know the "belted shape" concept has gone around this fandom for years, but I'd recommend not depending on it as in my opinion it doesn't translate nearly as well as just a general concept of the form - like how it doesn't work as well with Peridot when she becomes tiney

[obligatory PSA that anatomy knowledge/practice helps so much here - I've been drawing SU for YEARRSSSSS but my understanding of the forms got so much better when I started practicing gesture drawing/anatomy practice]
Expressions/facial anatomy:
so again, SU has so much style inconsistency that the way you draw expressions will vary based on the boarder - this EXCELLENT because this means expressions are really easy to pass in the style! but some visuals anyway:
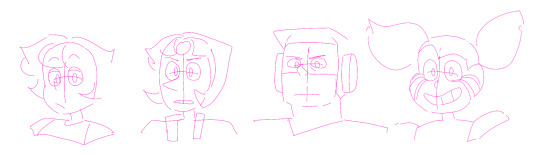
most of the time, faces are extremely simplified with one guideline across the face, a little bit higher than where the "cheek" starts if the character has a cheek
if more masculine, the guideline will be a bit higher and the eyes will be shorter
an interesting note with Spinel specifically is that her eyebrow expression is done through her hairline, which is part of her really fun 20s inspired look!
Lineart:
i feel like if anything really makes something look "canon", it's how the lineart is done in a finished piece. if I compare with a couple fake screens/edits I've attempted:
the lineart makes all the difference here!!!!
for specs reasons if you're curious, I use procreate with the "baskerville" brush on a higher stream line setting. I do not have pressure sensitivity, so all of my lines are hand-weighted, but if you have pressure sensitivity you might have an easier time here!
facial details tend to be slightly thinner. eyes tend to be a little bit thicker on either the top/bottom or sides, although it depends
outer borders, major clothing, outer hair tufts and other major features are the thickest lines
sometimes lines aren't used at ALL for various features (gem facets, some more minor clothing details, like the bottom of Lapis' top or the waistline on Jasper's uniform)
[random screenshots I pulled as examples]
the key part with lineart and style replication, though, is that is varies WILDLY by style. as long as you have some line weighting it's really easy to get it to pass as SU style

lastly I HIGHLY recommend practicing screenshot edits or fake screenshots if you can!!! I feel like the silly edits I do really help emphasize my understanding of what it takes to make something look like the style, and my little journey into making fake screenshots/"canon" screenshots is a big part of how I've learned to draw in SU style!!!
That's all I have for y'all, make all the SU art in the world!! 2025 will be the Year of Steven Universe Art!!!!
#steven universe will never be over so long we have Fake Screenshots under our belts......#I hope this was helpful!!!#silver's art#steven universe#su fanart#tutorial#art tutorial#self ship#fictional other#steven universe self ship
52 notes
·
View notes
Note
Would you ever do a tutorial on how you get that old school anime effect on your stuff?
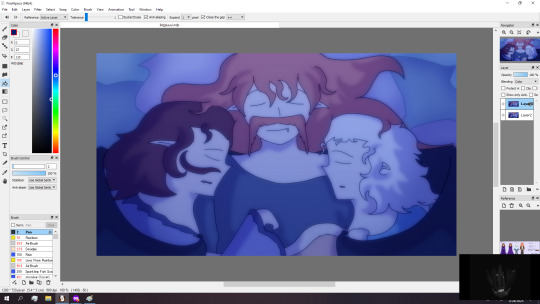
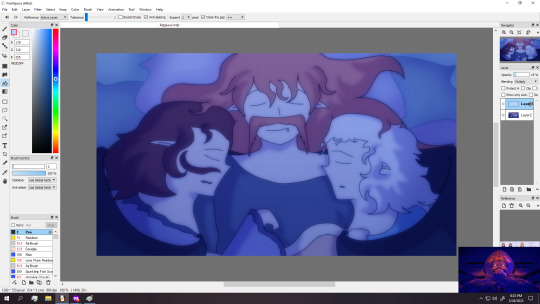
Sorry for taking so long to answer you anon, I am a derp at explaining but here is how I do my fake anime screenshots.
Tutorial below the keep reading as it is slightly long and I use FireAlpaca for this, but you can probably adapt this to other programs with the same layer effects.
First have your picture ready and merged into one layer.
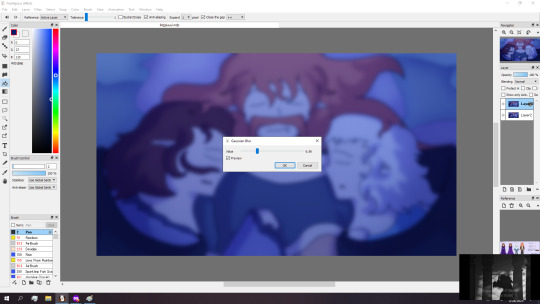

Then duplicate the image and apply a gaussian blur to it at around six percent strength or roughly the same blurriness of the screenshot.
After you blurred the layer, set the blending mode to screen and adjust the layer opacity to around fifteen to thirty percent before merging everything back to one layer.

Then duplicate the layer again and motion blur it to around thirty intensity and then set the layer to color blend mode before merging.
Next make a new layer and fill it with a light color and setting it to the multiply layer and reducing the opacity to around five to twenty percent. (I am using a light blue but my default is usually a pink or orange peach color when not in a night scene like this)
Merge the layers down afterwards.


Then I do a slight chromatic aberration on a duplicated layer and then adjust the opacity to around thirty percent before merging everything down. (Note that if your program of choice doesn't come with a native chromatic aberration, you can just search up chromatic aberration tutorial in (program of your choice))

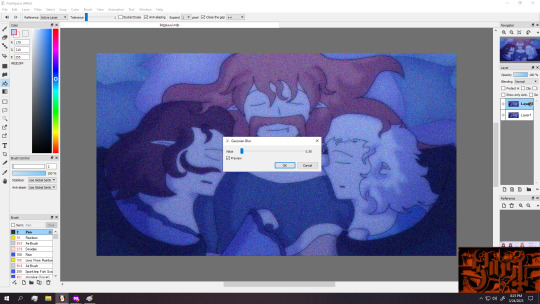
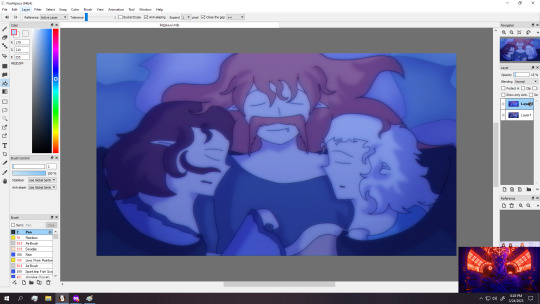
Once again duplicate the layer, and apply a noise filter at roughly hundred percent strength (or roughly to how the screenshot looks), before applying a very weak gaussian blur.
Merge everything down afterwards.

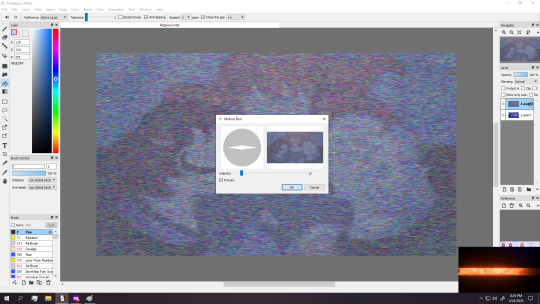

Optional step but you can duplicate the layer once again and apply several noise filters and a light motion blur before lowering the opacity to what you think looks right.
Next we duplicate the layer and apply the exclusion filter to it and lower the opacity of the layer by alot. (you can also just lower the saturation by a smidge if you don't have that layer option)
And you could call this done if you want, but for that extra crunch I use a program called NTSC RS. (I sadly do not know of an android version of this program)
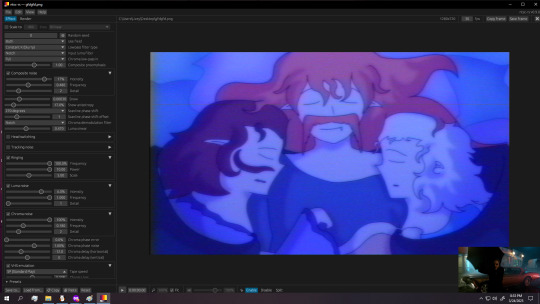
(And here are the settings I use)

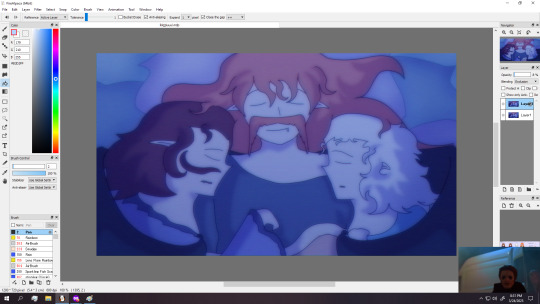
Either save or copy the image (called frame in program) and then drag it to a new layer of your image and adjust the opacity if you don't want too much retro crunch.
Then you can adjust the color and saturation if you want and then you are done.
Also for anyone wondering how to do retro captions, the image below shows what I typically use, making sure to duplicate the text, move that to below the text and apply slight gaussian blur and multiply effect to it

(You can do the text on the original image and let it get crunchy, but I honestly like the caption to be readable so I do that after the crunch.)
#tutorial#fake anime screenshot#retro anime tutorial#fire alpaca#ntsc rs#art process#this is just how i do it#you could honestly throw the image through ntsc rs and adjust as needed but i prefer doing both#fire alpaca tutorial
4 notes
·
View notes
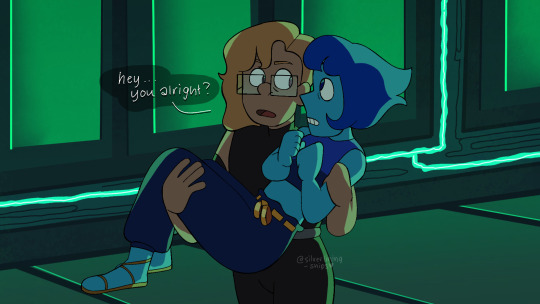
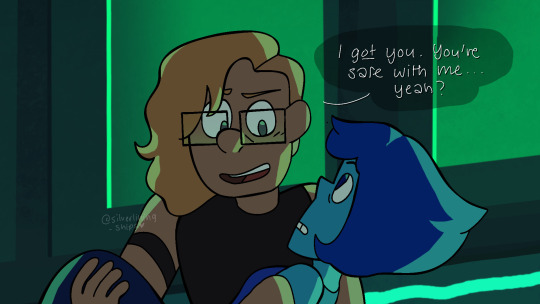
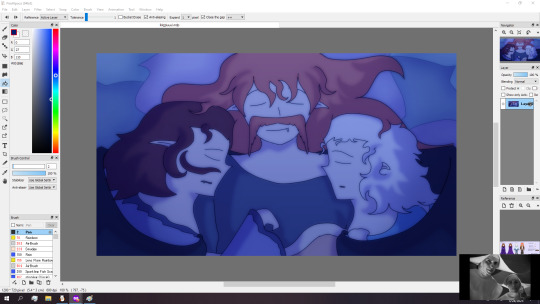
Text
...
#man i was like y tf am i so tried i didnt do shit today but no i got like 5hrs sleep. walked to the store in thr 12F weather. carried back#all my groceries. walked to the police station to get keys to the autoclave. read 40 slides abt anime. started redoing a tutorial#and spent 45 min on the phone giving my intake info for a new therapist. everytime i give the spiel it gets more exhausting#it feels so dramatic like whatever ill b fine but no im seeking help for a reason bleh#but now im tired and worried abt the semester bc itll b a lot. many plates to juggle with a fragile mind#my old boss was like u have an ambitious plan for the semester and im like oh boy well see how this goes#hopefully itll b fine once i get in the groove. just go one step at a time#currently i just wanna redraw 4lways sunny screenshots but idk what ones to draw#but should sleep. i gotta write a long email tomorrow morning for a class intro bc look at me im a professional who def#does not have underlying emotional problems. ugh. idk if i described my mood stuff right to the lady on the phone but like i got diagnosed#as b1polar for a reason idk i just still feel like its fake. like ill look at the checklists and get mad when i get a positive result#which is weird bc its like. u went to 3 doctors and they said the same thing shut up. ugh whatever. i need to sleepy#unrelated
8 notes
·
View notes
Text
Ao3 HTML/Coding Resources Part II
This is the HTML/Coding for Website mimicking resources in Archive of our Own (Ao3). To find Part I where I go over the Basics, General Text HTML and some Fancy Formatting (images, dividers, columns, photos, tabs etc. CLICK HERE!
Other Websites:
Texting
-How to make iOS Text Messages on Ao3 by CodenameCarrot, La_Temperanza
-A Quick Generator for Embeddable iOS Text Messages by 221b_ee
-imessage Skin by Adzaema
-Retro imessage by Adzaema
-Basic Text Message Work Skin by ProfessorMotz
- Bubble platform [workskin] by Khashana
-Chat Log HTML by deathbymistletoe
-LINE Messenger/Chat by imperiousmarshmellow
-IDOLish Rabbit Chat Workskin by associate
-Replika workskin by FaeriMagic
-Texting Workskin to match light/dark mode by irrationalpie
Tumblr
-Tumblr style CSS Tweaks by Aposiopesis
-Ao3 Workskin Testing and Tutorials by junietuesday25 tumblr DM
-How to make Tumblr Posts on Ao3 by phyyripo
-Plain Text Social Media Platforms by anubisms
-Tumblr Post Work Skin by tsukinosaugi
Twitter
-Repository - Twitter by gadaursan
- How to mimic Social Media in an Ao3 work by aerynevenstar
-Twitter Work Skin Template by etc e tal
-Twitter Workskin: Tweets and Profile by starskin
-Twitter Mock-Up by TheBrookesNook
Ao3/Fandom
-How to mimic Authors notes and Kudos/Comment Buttons by La_Temperanza
-How to mimic AO3 Comments by bittermoons
-How to add mobile Ao3 in your fic by DemigodofAgni
-How to make a fanfic style header Ao3 style by ElectricAlice
-Template for adding post chapter content by SpookyTesting
-CSS based full Ao3 fic integration (Header/Overview, Comments, Title, Summary & Buttons) by deciMae
-How to Mimic LiveJournal Posts and Comments by cursedcuriosities
-Dreamwidth Entries & Comments Work Skin by folk_melody
Facebook/Instagram/Whatsapp
-Whatsapp Group Chat builder by FestiveFerret
-How to make Facebook Messenger Chat on Ao3 by ran_a_dom
-Whatsapp Work Skin Template Revamped by etc e tal
-Whatsapp group chat skin by ovely
-Instagram DMs for Ao3 by monarch_rhapsodies
-How to make Instagram DM mockup by xslytherclawx
-Penstagram chats on ao3 by deciMae
Snapchat
-Snapchat skin by Azdaema
-Snapchat Template for Ao3 by starskin
Reddit/Forum
-UPDATED Reddit Skin by diamine
-2020 Reddit Work Skin by timstokerlovebot
-Reddit Work Skin CSS & HTML by knave_of_swords
-How to mimic Social Media in an Ao3 work by aerynevenstar
-template Reddit Skin by spookedcroon
-template:Subreddit page by ireseen
-Ao3 workskin for Forum Thread by fencesit
-Ao3 workskin for Forum Thread [Expansion Pack] by AMereDream
-How to mimic 4chan posts without just taking screenshots of 4chan
Twitch/Youtube
-Mimicking Twitch Chat for fics by Ultraviollett
-Twitch Chat Work Skin by cherrari
-Workskin testing by tohmas [Youtube comments]
-Youtube Work Skin by 1864s
-Youtube Comment Section Workskin by LupaMoe
Discord/Slack/Zoom
-2023 Discord Theme Workskin by TrojanTeapot
-Discord Work Skin by unpredictableArtist
-Discord (Dark Theme) Workskin by Heterochromia_Mars
-Skin for Recreating Discord’s Server Member List by SpookyTesting
-Ao3 Workskin Testing and Tutorials by junietuesday25
-Slack Workskin by Khashana
-Zoom inspired Ao3 skin by mystyrust
Wikipedia
-Fake Wikipedia article about a TV show: Work Skin by Anonymous
-Wikipedia article work skin by styletests
-SCP Wiki Style Workskin by thesnager
Working Games in Ao3 Tutorials
Logic Grid Puzzle Work Skin & Tutorial by BookKeep
The Case Of The Clickable Murdle by VThinksOn
Review Sites:
Yelp Reviews by kiwiana
Amazon Reviews by kiwiana
Rate My Professor Work Skin by BookKeep
Video Game Dialog Mimics
-Dialog [workskin] by Clover_Zero
-Dialogue Workskin (with parallax BG effect) by mystyrust
-My S Ranks--System Windows by unpredictableArtist [computer dialog workskin]
-Tutorial: Ace Attorney Work Skin by QuailFence
-Among Us Ao3 skin by mystyrust
-How to Mimic Undertale Fonts on Ao3 by La_Temperanza
-Tutorial:Rain Code Work Skin by faish
-Balder's Gate 3 Documents Work Skin by Professor_Rye
-SpookyTesting has SOO many Nintendo based ones
–Mimicking Minecraft for some fics by Ultraviollett
Runescape Right Click Menu Formatting by fennfics
How to put Z skits in your Tales fics by wingedcatgirl
How to make Honkai: Star Rail Messages by html_hell (jihnari)
Hold-hands inspired Texting skin by cursedcuriocities(SetsuntaMew)
Simple Linkshell Ao3 Work Skin by Pent – Final Fantasy XIV mimic
Homestuck Chat Clients by 77angel-skins
Workskin: Slay the Princess by ASpooky
Slay the Princess: Updated Workskin by Lilto
Misc. Sites
--How to mimic Deadpool Thinking boxes by La_Temperanza
--FetLife Skin [Work Skin] by Khashana
--Disco Elysium workskin by SarunoHadaki
--StarTrek PADD workskin by duskyspirit
--MDZS-themed letters by allollipoppins
--A Newbie's Guide to Podficcing by Adzaema [skin for podfics]
--Skin for making Character Intro Cards by SpookyTesting
--Kpop Photocards by legonerd
–OVR System Workskin by unpredictableArtist
-How to make Stylized CSS Card Links for your fics by buttertartz
-vroom vroom kachow: Formula1 Race Results Workskin by mackerel_cheese
Bonus: Ever wanted to see how crazy HTML can be on AO3? Try playing But can it run Doom? or Tropémon by gifbot
Happy Creating!
Last updated: Feb 8 2025 (Have a resource that you want to share? My inbox is open!)
View Part I with HTML Basics HERE!
#archive of our own#html coding#fanfiction#fanfic#fanfic writing#fic writing#fanfic help#ao3 fanfic#ao3 author#ao3 writer#ao3fic#ao3#ao3 link#ao3feed#fanfics#fanfic coding#fanfiction writer#fanfiction author#fanfiction crossover
61 notes
·
View notes
Text
What type of tumblr user Hogwarts Legacy characters would be
Note, I haven’t actually been part of tumblr culture since the 2010s
Sebastian
cursed memes, infodumping on extremely niche topics, and extremely tumblr style humour.
The guy who knows precisely how to respond to someone saying ‘I like your shoelaces’.
He’s never watched Supernatural in his life but read up on all 25 seasons when the superhell penultimate season finale hit.
Gets into drama with anon asks.
political takes that are usually decent and anti-capitalist, except for one opinion that got him canceled
Sebastian once spent a night accidentally reblogging NSFW content to his main blog instead of his side one so now 50% of his fetishes have been exposed.
Every photo and video he posts/reblogs, he adds a description caption so Ominis can also be subjected to his taste in memes.
Ominis
primarily text and music based, but will occasionally have videos of nature or architecture.
A lot of quotes from angsty classical literature and MCR.
His tagging is methodical and precise.
He has a huge following because one time he posted a photo of himself (taken by Sebastian) and it went viral.
Has his asks turned off and follows less than 30 blogs.
Someone once posted an expose on him, calling him a trust fund kid, but since it was mostly screenshots without description captions he never came across it.
Anne
she has one tumblr that all her friends follow her on and one secret tumblr that’s the dark side, depression, venting diary kind of stuff.
When the site went through another round of content moderation, she deleted it.
she also accidentally deleted her main blog oops...
Her normal tumblr is skateboard trick videos, small fandom media, and a mish-mesh of whatever catches her interest for the month.
She really likes the elaborate, artsy makeup looks even though she herself rarely wears it.
reblogs posts related to chronic illness and eye related disability
Her humour is ‘just girly things: waking up covered in blood’
Poppy
sooo many cute animal videos.
Has a very cutesy layout with an animal cursor.
Some people hate her blog because it has an autoplay music widget playing MARINA/Olivia Rodrigo.
She has anon asks turned off but will respond to account asks.
Occasionally reblogs a vegan/animal activist post.
She has a few close friends and will not hesitate to reblog their posts with encouraging comments.
Natsai
on the multi-lingual side of tumblr– english, french, and swahili
Lots of funny personal anecdote stories
Reblogs feminist posts that either deal with actionable things (protesting, community organising, safety) or talking about feminist public figures
Reblogs black hair tutorial/pics with the mindset that she’ll try it out but never does.
martial arts videos but the realistic ones
Likes a lot of special effects art in movies/tv shows so if you follow her with SFW filters turned off, you might see some fake blood.
Amit
studyblr, langblr, and a little bit of geeky stuff
okay, it's a lot. He's a fan of non-DC, non-Marvel comic and Star Trek
will write a 900 word breakdown of that one specific scene and its symbolism
too ashamed to openly admit he reads fanfic but reblogs a lot of posts from accounts who do
Imelda
1 post complaining about the complexities of using tumblr
3 posts related to women's football (soccer for americans)
1 personal video of her scoring the winning goal for her team
1 post and response to clowning on Garreth
'last posted 1 year ago'
MC
I’m using my OC Anesidora Fig from Shadow consumes the Sun (link in profile)
Used to have one of those semi-anonymous blogs where it’s filled with aesthetic photo compilations (light and dark academia, romanticising living in old cities, tea and coffee photoshoots despite not liking the drinks), but then she went ‘lets be mutuals, Ominis :)’ and realised…
So she panic nuked her blog and started over.
Now it’s full of studyblr, tagamemnon gossip over dead ancient roman poets, and love/romantic poems/excerpts.
english and french language included
went viral when she posted a class project video where she edited how to train your dragon but the dragon was replaced with her pet reptile a la "Jurassic Park but with a Cat" (OwlKitty)
When she starts to fancy Ominis, her reblogged love quotes start to focus more and more on his specific attributes
Since the texts she reblogs don’t have crass language or kinks, she thinks it’s entirely SFW. However, Ominis has learnt not to open her blog when he’s not alone or someone will ask him why he’s red in the face.
Her asks are open but she ignores them 90% of the time.
#hogwarts legacy#writeblood writing#hogwarts legacy headcanons#hogwarts legacy headcanon#ominis x mc#sebastian sallow#anne sallow#ominis gaunt#poppy sweeting#natsai onai#amit thakkar#imelda reyes
39 notes
·
View notes
Text
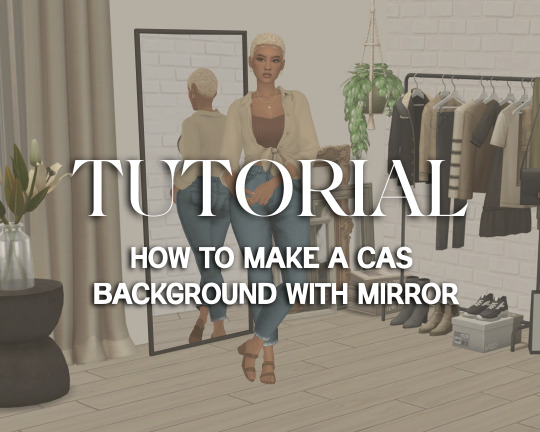
Tutorial: How to Make a CAS Background With Functional Mirror
Overview
This is something that has been highly requested so I hope this tutorial will be helpful for the sims 4 cc community!
This tutorial will have 2 parts for creating 2 different types of CAS "room" backgrounds. Part 1 (The Easy Way) uses a template I created for you to use your own 2D images/screenshots with a simple rectangular mirror. Part 2 (The 3D Room) will result in a better quality background, but it’s not a beginner friendly project so I don’t recommend trying it if you’ve never made any cc before. I will not cover the basics of cc making here, only what’s relevant to making a CAS bg using my template specifically. The Sims 4 Studio forum has a ton of great tutorials for everything else.
In my own research & experimentation, I noticed that (as far as I can tell) EVERY other CAS room with a functional mirror seems to be derived originally from LittleDica's CAS room [link] I want to acknowledge credit to LittleDica for their CAS background which I studied as a reference. But to be clear this tutorial and my templates are NOT derived from another creators' work; I created mine from scratch and it took a lot of time and effort. My version is much more simple and more compatible with Sims 4 Studio because there are no extra mesh groups or diffuse maps. I also made a great effort to make the reflection in the mirror more realistic for the size of the room. I hope you will be able to use this resource to create your own beautiful CAS backgrounds! ♥
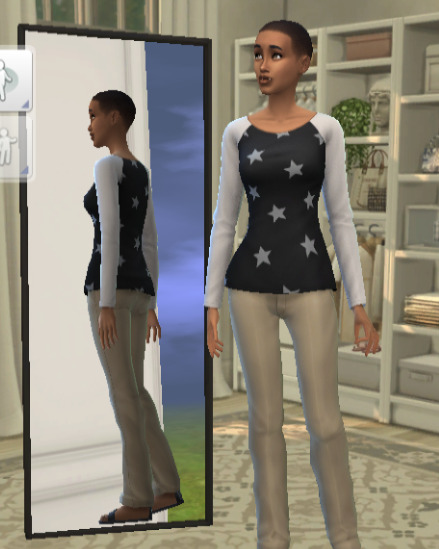
Also in case you missed it, you can download my CAS background used in the preview [here] (it is slightly different from the template package.)
Requirements:
Sims 4 studio
Image editor (Ideally photoshop)
my templates (attached below)
—————
Part 01: The Easy Way
The easiest way to create a CAS background with mirror is to use my attached templates.
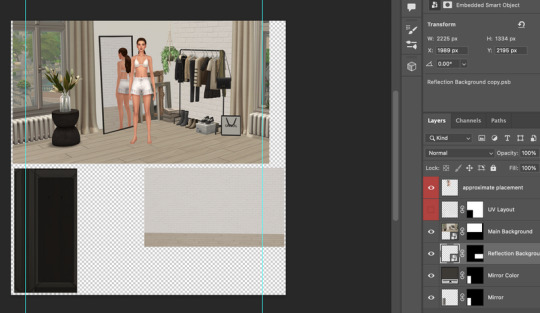
The PSD template is the best option, but for those of you that don’t have Photoshop, there is a PNG version as well.
You will need 2 images; one for the main background, and one that will be reflected in the mirror. The large top area is the main background, and the smaller rectangle at the bottom is what will be reflected in the mirror behind your sim.
In the image editor, paste your images and resize them to fit into the outlined areas.
For framing your screenshots, it’s important to understand that the mirror is actually just floating in space in front of a flat background. That means you’ll have to fake the perspective a bit and that may require some trial and error to get right. I recommend taking multiple screenshots at a variety of angles so you have options to work with. Use the model sim as a guide to help you with placing your background image. (Don’t forget to hide the model sim and UV layout when you’re done!)
Save as .PNG or .DDS and import it into the template package in Sims 4 Studio.
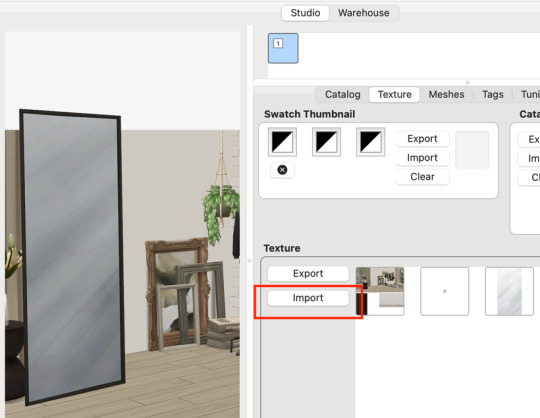
That’s it! My goal was to make it super easy for you. Remember to only use one CAS background in your mods folder at a time since it's an override. Also note that it is not compatible with 'cas blob remover' since the instance for the dropshadow is now used as the mirror.
TOU — PLEASE READ:
I give permission to the Sims community to use my template files and modify them as needed to create your own CAS backgrounds. This took months of work, researching and experimenting, so please respect the effort I put into creating this resource by agreeing to these simple terms:
Don’t re-upload my files. Don’t claim my work as your own. If you use my templates for your cc, please share credit with my username (Lijoue) and link to my Patreon page. If you make any money from cc created with my templates, please consider making a donation via my Patreon. It is greatly appreciated.
download template files here
Part 02: The 3D Room
to be continued…
This part will take more time to finish because there’s a lot more steps involved in creating a 3D CAS room. In the meantime, the template should be enough of a starting point for those of you that already know how to make cc objects, since I already handled the hardest parts. Just understand that the mirror reflection is not automatically calculated, meaning that if you move the mirror in the mesh, you will need to change the Mirror Plane Normal and Mirror Plane Offset in S4Studio Warehouse to match the new angle or position. Otherwise it may look unrealistic or worse, it could reflect the eerie wasteland world that the CAS room is set in. (pictured below)
#sims 4 creator#sims 4 tutorial#the sims cc#ts4 maxis cc#maxis match cc#sims 4 maxis match#ts4 tutorial#sims 4 studio#ts4 custom content#ts4 cc#cas backgrounds#sims 4 cas
215 notes
·
View notes
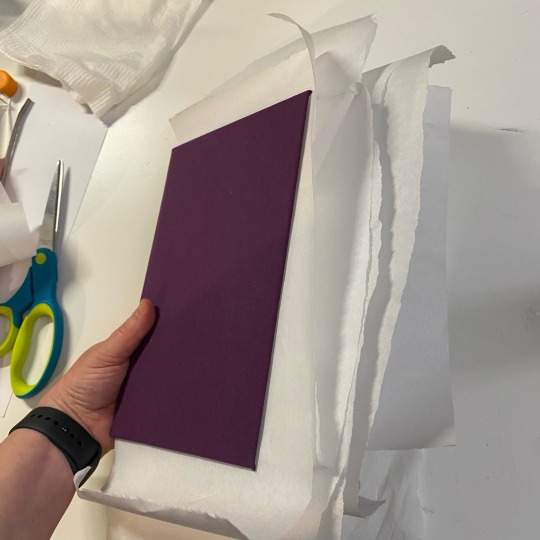
Text
Okay, this is gonna be a long one, so I’m putting it under a cut. Folks on Reddit have asked for a walkthrough of my bookbinding process, so I’m going to detail it. A few steps I forgot to take pictures of, but I’ll keep them in the list so that the workflow hopefully makes sense.
🌟 This is not meant to be an in-depth tutorial! For bookbinding/fanbinding tutorials with guided steps I recommend LadyBobbitt on TikTok or DASBookbinding on YouTube. 🌟
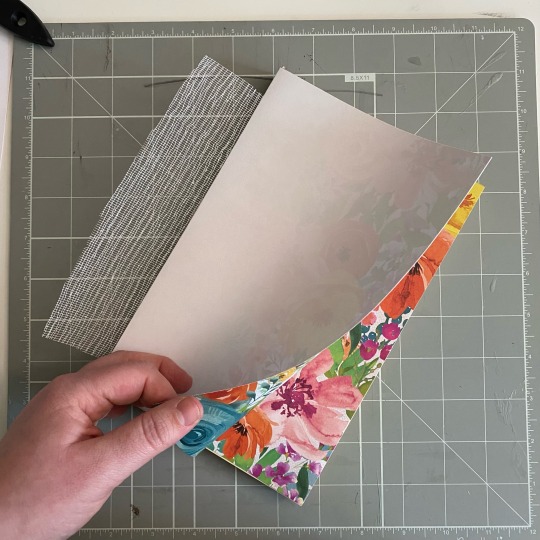
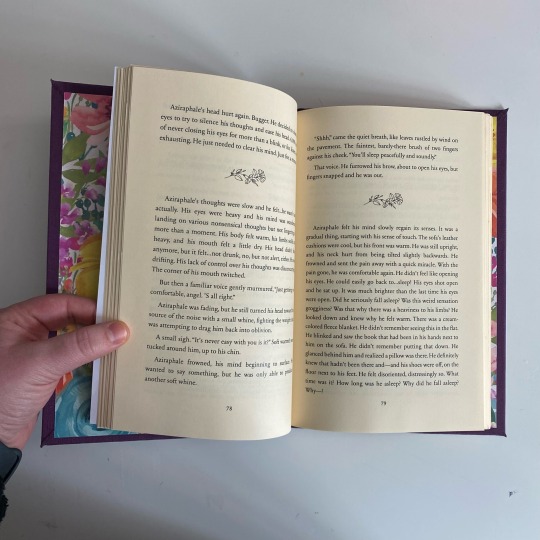
Fic pictured in every step after Step 3 is “Pretend for Me” by @obsessivelollipoplalala because I was working on an author’s copy! 🌝
Step 1 - Typesetting (not pictured)
Step 2 - Printing and folding the signatures (not pictured)
Step 3 - Punching the signatures. This is a 3D printed punch cradle from Etsy. I don’t recommend the Memory Keepers brand one on Amazon—it’s really shallow and hard to get centered punches.
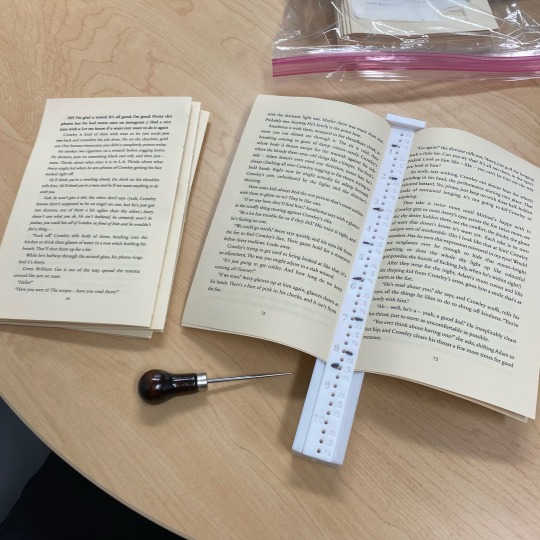
Step 4 - Sewing the signatures, aka my least favorite part. Everything is downhill after you get it sewn. My preferred method for sewing signatures is called the kettle stitch.
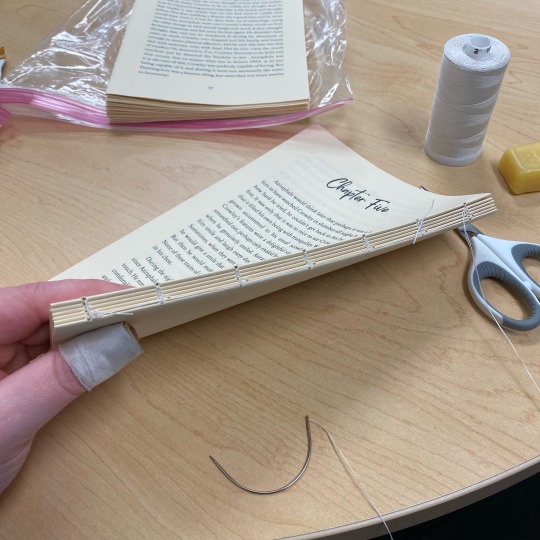
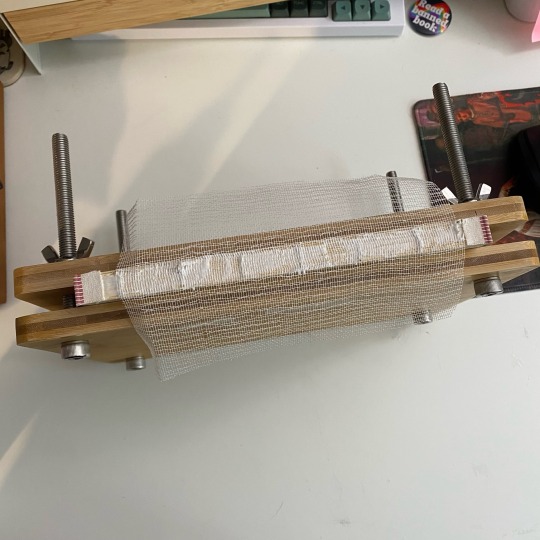
Step 5 - Clamping the text block, reinforcing the spine with mull, and adding fake endbands
Step 6 - Gluing endpapers onto the text block after the spine reinforcement has dried
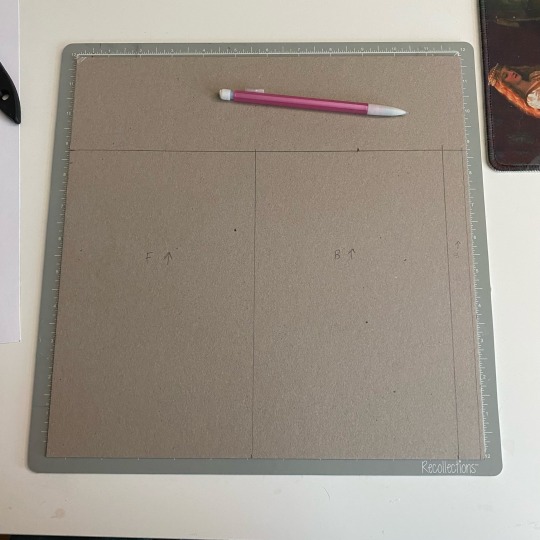
Step 7 - Measuring and cutting the cover chipboard
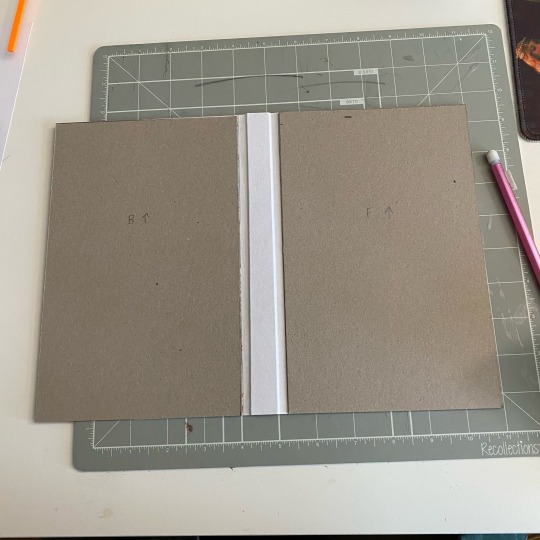
Step 8 - Forming the cover. I glue the chipboard to a central piece of cardstock. Some people find that this makes your creases less sharp, but I like the extra reinforcement.
Step 9 - Dry fit the text block to make sure everything is sized properly (not pictured)
Step 10 - Gluing the cover onto the bookcloth (this is the underside—the edges also get glued and folded over onto the chipboard)
Step 11 - Casing in the text block (not pictured). I add glue to the outsides of the endpapers and stick them to the inside of the cover. Once everything is placed correctly, I wipe off any excess glue and make sure there are no air bubbles anywhere.
Step 12 - Placing parchment paper between all wet/glued areas to prevent moisture transfer to the pages.
Step 13 - Press! (Not pictured)
Step 14 - Let dry overnight, then you have a book!

Not including the dust jacket making process here because it would require me to take screenshots from my computer and I’m sick rn so who has the energy?
Anyway thanks for looking if you scrolled this far :)
#bookbinding#fanbinding#ficbinding#book binding#book binder#bookbinders of tumblr#fic binding#my bookbinding
138 notes
·
View notes
Text
Got an ask that wants to find out how I make my fake-but-canon screenshots: I figured I'd put together a Paint Tool SAI 2 tutorial
7 notes
·
View notes
Note
your post about ReLight is really interesting! I wanted to try it out but I understand nothing lol would you share some tips/tricks/little tutorial for dumbs like me on how to use it/setup for The Sims?
Hi anon!
It's not a massively involved shader, it's really simple, so a full tutorial would probably be a little over the top. Using it in TS4 is no different to using it in any other game.
The first thing I'd do is look at the preprocessor definition section at the bottom of the shader settings and change number of lights to 4 and hit enter. It'll reload and then you'll have 4 different lights to play with.
For the settings at the top, you want Use Smooth Normals turned on, and then all the boxes under Shadows ticked. For Shadow Mode you'll get the best quality with Trace All selected, and Ultra for Shadow Quality, but you can play around with these if your performance suffers (bear in mind I'm using a 980ti and hotsampling to larger resolutions and I'm fine with those settings).
Leave Shadow Sharpness at its default unless you want to go for a specific look, and you can keep Z Thickness at default too. You can play around with Z Thickness if shadows look like they're starting or ending in weird places. They're never going to be 100% accurate anyway, but you can sometimes coax them into not being truly awful.
One of the most important settings is down at the bottom: Visualize Light Position. Turn this on and it'll show you a round dot where your lights are positioned. This is really useful for lining them up exactly where you want them. Then, when you're done, you can turn them off (although they will disappear when you close the ReShade menu anyway, but this setting is useful for people like me who sometimes keep the ReShade menu open when taking screenshots so I can keep tweaking).
You'll see 4 sections that each start with a checkbox that says Active. Those are your 4 lights. Tick the ones you want to use. Then you can start moving them.
Next to Position there are 3 boxes, and they each represent respectively: left-right, up-down, backwards-forwards. Play around sliding each of them and see where your dot of light goes. You'll quickly get the hang of how to move the lights around using those position numbers.
Below that is Tint. It's easiest to click on the box of colour and colour pick than it is to manually change the RGB numbers. This controls the colour of your light.
Below that is Intensity. I think by default the lights are set up at the maximum level of 1.00 but that's super super bright, so bring that down considerably. You can use this to fine tune exactly how much illumination you want once you've set up the position.
And that's really it. You can use the lights to add more accurate light fall-off and shadows from in-game light sources like lamps, streetlights, windows, etc. You can also use it to just brighten a character's face a bit more for a clearer picture. Or you can really go to town and add completely fake and dramatic lights. It's up to you.
If you find that 4 lights isn't enough, you can't add more without editing the actual shader code. However, you can just duplicate the shader, so then you can have 8 lights, or 12, or 16, however many times you duplicate it.
To duplicate ReLight, create a copy of the shader in your shader folder, and give it a unique name (for example, qUINT_ReLight2.fx). Then, open it up in a text editor (I use Notepad++) and scroll all the way down to the bottom. You'll see a section that says
technique qUINT_ReLight
edit that so it matches the name you gave your copy, so in this case
technique qUINT_ReLight2
Then you can use them both alongside each other. I do start to experience a performance impact when using a second version, so bear that in mind.
I'm sure the better option would be to edit the shader code to add the ability for more lights directly in the first shader, but you'd need to be semi-knowledgeable about what to change. You're not often going to need more than 4 anyway, so it's overkill.
140 notes
·
View notes
Note
what's ur pc specs and how do u get your virtual photography shots to look so good and hd?
These are my specs!
NVIDIA GeForce RTX 4070 13th Gen Intel® Core i5-13400F 32 GB RAM MSI monitor - 2560 x 1440, 165Hz
I usually do the highest possible graphics settings in my games and use raytracing.
I use Otis_Inf's camera tools and reshade for my screenshots! I use the hotsampling feature, which basically will "fake" a higher resolution of your game. So my native resolution is 2K (2560x1440), but I want 4K screenshots, so I will hot sample 4480x2520 so that the outcome looks much higher quality.
I also subscribe to Pascal Gilcher's patreon to get the "ReLight" add-on for ReShade (you can add new lights to the game and place them where you want).
Using the IGCS depth of field add-on also greatly improves the quality of a screenshot :)
I have some tutorials here for BG3 virtual photography and these tools, but I use the same process for every game!
21 notes
·
View notes
Note
Could you make a tutorial on how you go about making your vhs screenshots? They look awesome and I want to try to implement that style in some of my own art. Thanks so much!!!
So i use clip studio and the settings i always see on other tutorials are only on photoshop (vibrance) so i baso made my own auto actions copying them and i've uploaded them. This will also be long becoz i always try make tutotials that I would want to see when looking up a tutorial.
Sketch ur scene. I don't worry about sticking to 1980s (or whatever era) framing or style choices usually. For backgrounds i can do a bigger tutorial but i basically use clips gouache or some watercolour brushes for blending. Ghibli and 1942 Bambi for the textures and don bluth etc for the colours as a rough guide. I use this blog for some references but also just searching '[film name] backgrounds' or something like 'ghibli snow/roads/grass'
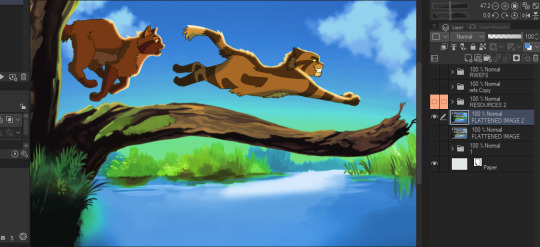
So i draw the scene. Use a dark brown for inks. Duplicate that, fill with yellow, blur 5 and 30% opacity underneath. I copy the base layer/character layer, fill with same brown and blur so its a “drop shadow”
I also duplicate the shadows, blur one about 12-18 and set both to half opacity. Same with lighting. Any rim light is the Ink layer duplicated, filled white, overlay or glow it depends on what fits best, and the bits i dont want white erased.

All text is Arial yellow with a black border. My style of drawing varies a lot by i try for a fuzzy 80s fur look- like kosperry or don bluth i guess. thats what the 'cats' layer looks like ^^^.
Okay onto edits. Flatten image and duplicate in case u fuck up. Auto actions are linked above (i have the box ticked/the action closed to speed things up and only adjust the important bits)
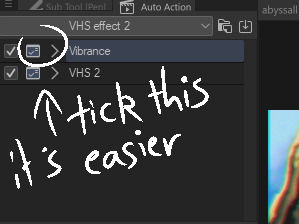
Blur - gaussian, start mild and u can build up from there.

Fake vibrance- you can use saturation ig but this (to my knowledge) targets the light and shadow differently. I literally copied how the photoshop vibrance works. I use anywhere from 25-85 strength (mainly 40), it looks less saturated once u click okay so just experiment.
Chromatic abberation - I use this one. Move to liking and merge
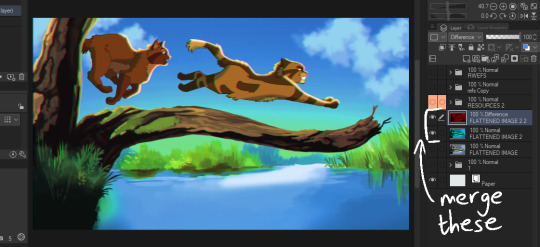
Vhs 2 - this is the other auto action i made, it’s basically another blur, motion blur and some image adjustments.
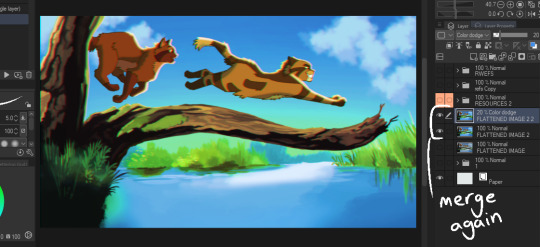
Final additions - 1 is a noise layer (clip studio perlin noise), 2 is a free VHS overlay set to hue (find one with colours u like!), 3 is a new layer filled with a bright colour/colour that fits the vibe you are going for (here i used blue for the blue background + sunny vibes) set to lighten and adjust
and thats it for me!
Happy VHSing!
#please let me know if these autoactions work! there shud be two in the download!!!#warrior cats#vhs#ghibli aesthetic#retro aesthetic#art tutorial#vhs tutorial
130 notes
·
View notes
Note
hi, me again ! a tutorial would be amazing thank you so much ?!!! you’re literally so kind for offering 🥹🥹 is this the social dummy that’s no longer in the app store? i had it once b4 so i can download it again thankfully !! haha but ive just never gotten around to using it ! thank you have a great night xx
YES OF COURSE sorry it’s so late babe i have been stupidly busy but the tut will be under the cut!!
so yes this is the app!

when you open the app, it’ll have you create profiles. so i have profiles for each of the drivers that i write for and they look like this!

after you’ve created your profiles, the main page will look like this:

once here, click the “messages” icon on the top right! once open, click the “+” on the top right!

then it’ll ask you to chose the profile of who you want to “text” and all the accounts you’ve created will show up. from there, you click done and the fake convo will pop up!
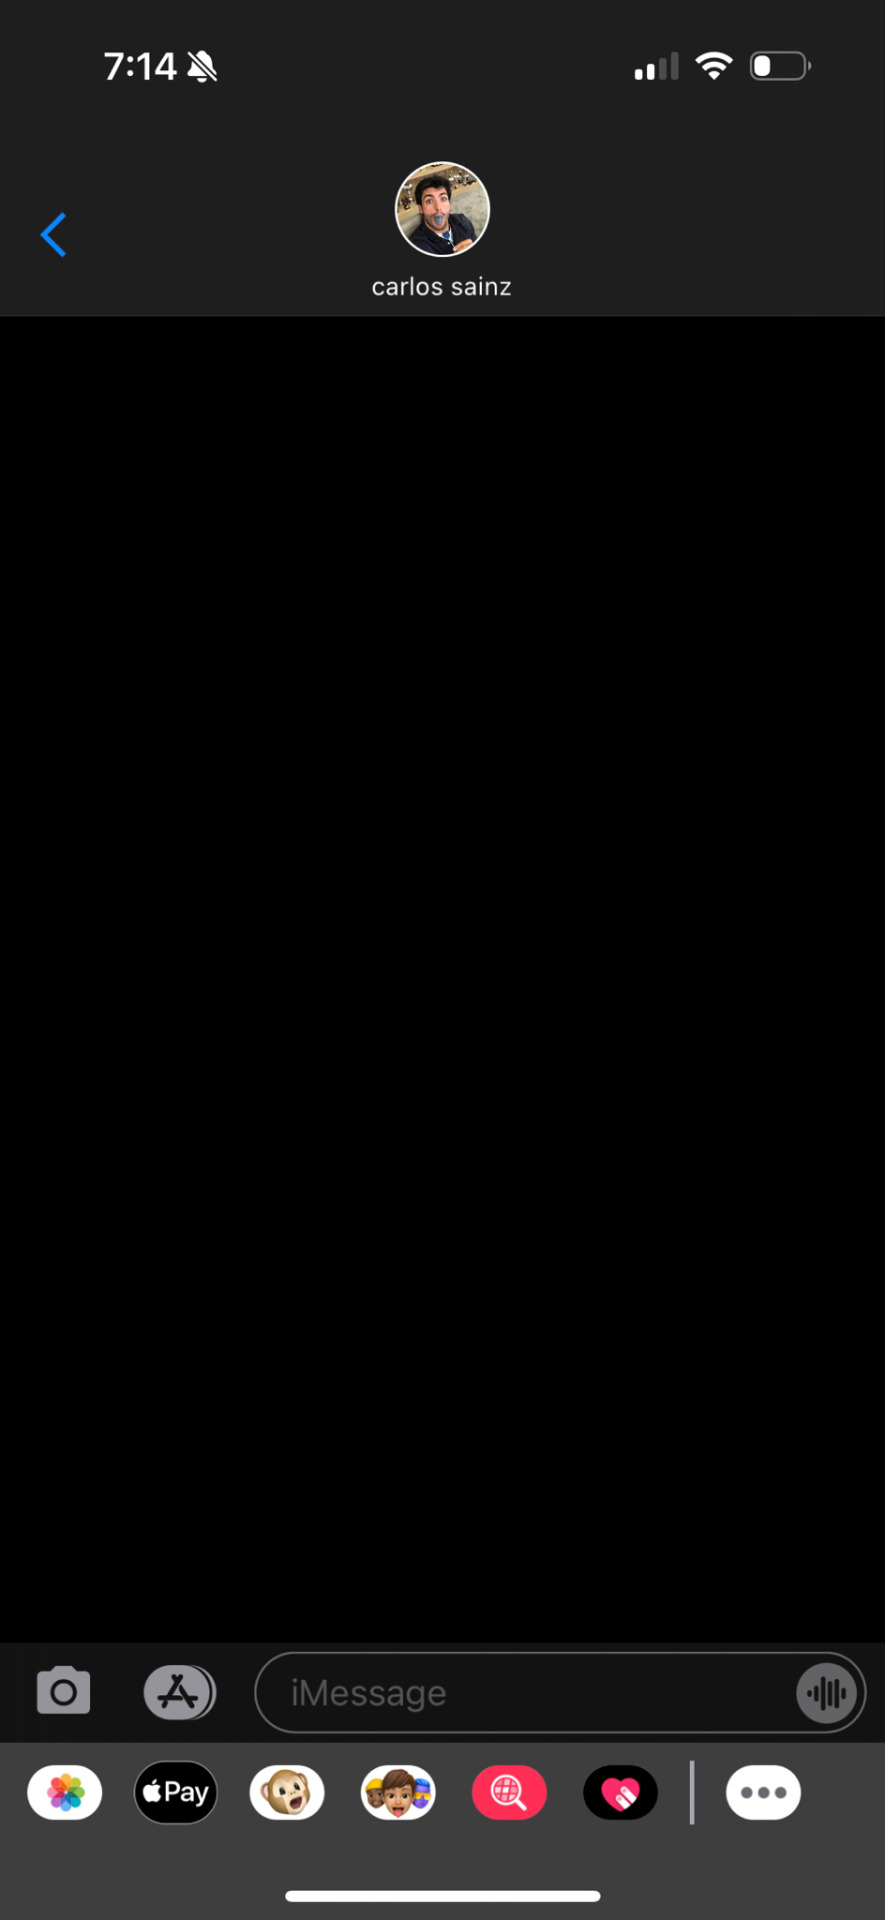
if you click on their icon at the top, you’ll be able to change their name in the chat, save the screenshot, a whole bunch of other settings. then you text away!!
hope this helped! im not very good at tutorials lol but i tried!! 🫶🏼🫶🏼🫶🏼
7 notes
·
View notes
Text
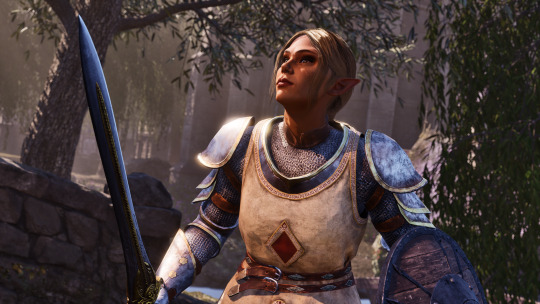
Oblivion Remaster Screenarcher/Virtual Photography Tutorial
bc selfishly i want so many hq photos
1. Downloading
Download Universal Unreal Engine 5 Unlocker. You'll need to subscribe to a Patreon for it. This will enable you to pause the game, remove UI, add lighting into the game for better shots of characters, change FOVs, and much more. While UE5 Unlocker is not strictly necessary (you can use the cheat togglefreecamera to fly around), I don't think you can do things like add lighting and changing the cameras FOV nearly as easily.
You will also need ReShade, which is thankfully free. Without ReShade, the hotsampling and depth of field portions of this tutorial won't work. If you don't want a preset, you don't have to have one. Just ReShade's functionality is needed here. Make sure when you download ReShade that you download the one with full add-on support. This is important later.

2. Enabling UE5 Unlocker
Once you have the UE5 Unlocker downloaded, put it in a folder of your choosing. Start running Oblivion, then UE5 Unlocker by double-clicking this

Once open, you'll need to select a game to inject this camera tool into. Pick Oblivion, then you should be good to go!
3. Controls for UE5 Unlocker
Set up your keys the way you like. The way it's set up by default doesn't work well for me personally, so I always change the camera movement keys. It'll all come down to personal preference.
4. Hotsampling (Taking HD screenshots)
Hotsampling means that you'll briefly run the game in a higher resolution than what your monitor is. If you're playing on a 4k screen, you can probably ignore this step unless you want HUGE screenshots.
Before you start hotsampling, make sure your game is in windowed mode. If you have two monitors, make sure that only one is enabled while hotsampling. If either of these settings is ignored, it will not work. Make sure ReShade is downloaded as well — once it is, navigate to the settings tab (you can get there by pressing Home on your keyboard). Make sure you like the screenshot key that's set up, and change it if you don't like the default. By default, your screenshots will go to the folder where the game's .exe is. You can also change the screenshot folder location if you'd like. You have to take hotsampled screenshots with ReShade.
Now navigate to the hotsampling tab in UE5 unlocker & change the numbers in these two boxes to be something higher than your monitor's size (you can find your monitor's size in your PC's display settings if you don't know yours). I usually go for 2x larger. Hit run. Your game will probably be half off your screen, which means it's working! Take a screenshot using the screenshot key you set up earlier. Find it in the folder, and it should be in high resolution!
To bring your game's screen back to a normal size, hit the fake full-screen button.
Alternatively, if not using UE5 Unlocker, SRWE is another utility for hotsampling. I haven't tried using it with the remaster yet, but I imagine it should work.
5. Adding Depth of Field to Screenshots
This is basically an add-on for ReShade that renders really incredible depth of field for screenshots. Download it from here, and follow the page's instructions on how to install and use.
A quick tip is to set the rendering to slow instead of fast. I find this helps my images to look way less blurry for whatever reason.
I find this helps remove the dot-like effect on the rendering of hair in-game.
6. Post-Processing
By doing all of this, my screenshots went from this to this <3
This one is up to your own tastes! You can leave your screenshot as is, or edit it. I just figured I'd mention Photopea to edit screenshots as it's a free & great editor.


Please reach out in the comments if you need help or have questions! I love this sorta stuff
4 notes
·
View notes
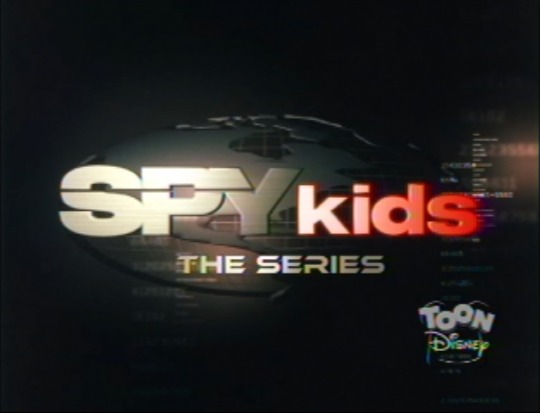
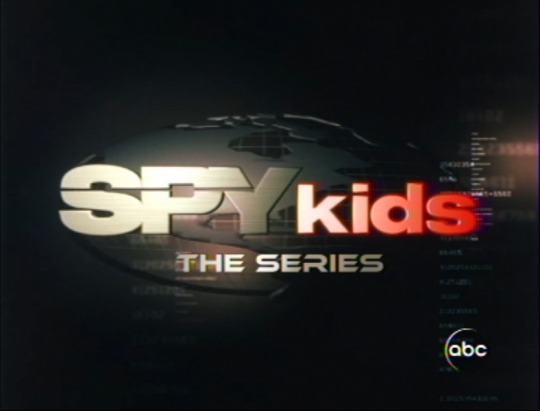
Text
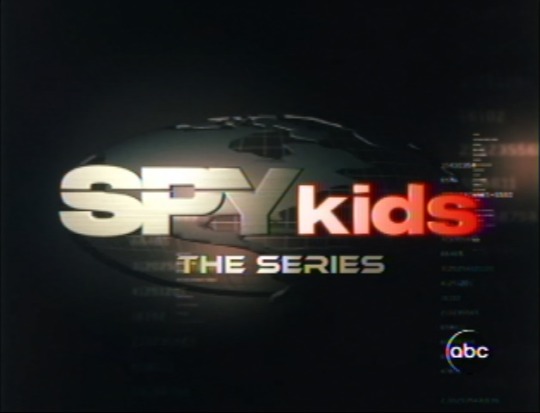
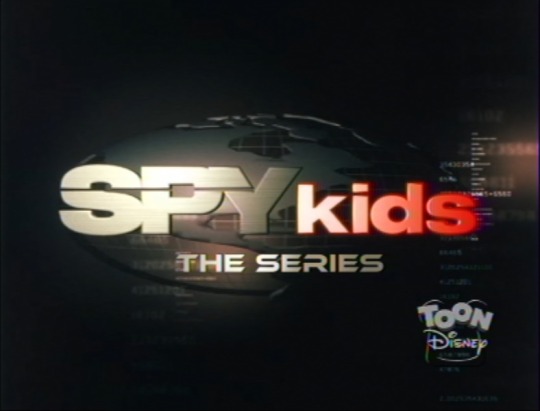
Hey, so, I was scrolling through the internet and found an old obscured Angelfire site that hasn't been updated since 2004, and on it I found this screencap of a... Spy Kids cartoon??? Apparently there was a Spy Kids cartoon that aired on ABC in the '00s, likely on the One Saturday Morning block. I have not heard of it at all until now. Thanks to whoever you are for recording this on VHS.
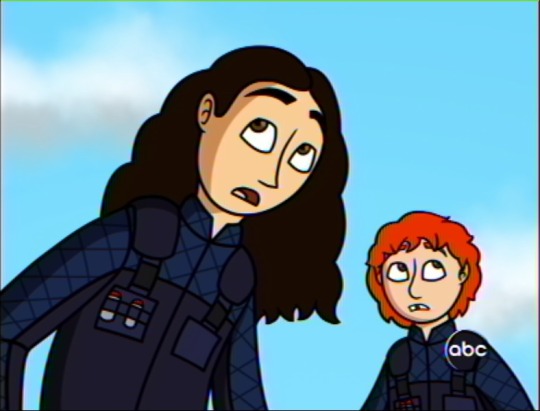
I did a bit more digging and apparently it aired on Toon Disney as well, as I found a smaller capture of a Toon Disney airing, this time on a Blogger site.
What is going on? What time did this cartoon air, and why haven't we heard much about it?
...
And scene. Had you fooled, didn't I? S:)
So you may have noticed that these screencaps are obviously fake. Hope they were convincing enough. I've been wanting to make fake screencaps of my Spy Kids cartoon pitch for a while now. This was not only an opportunity to test out simplified, possibly animation-friendly designs of the characters for the screencap, but also to play around with a very useful VHS effect and test out a cloud brush. I also used these fake screenshot and RGB split effect tutorials by @sassatello and @23i2ko which have been a big help in making a convincing enough screencap.
While I drew and coloured the first screencap, with a comic artstyle meant to emulate the likes of shows such as Ben 10 and TMNT '03, the second screencap is more of an edited capture of the Spy Kids title from the trailer, with a "the series" title at the bottom (using the Ethnocentric RG font used in many Spy Kids ads and merchandise), as if the intro was finishing up (the theme song is definitely gonna be Spy Kids Save the World by Fonda).
You can see the screencaps sans the VHS effect and screenbugs down below.

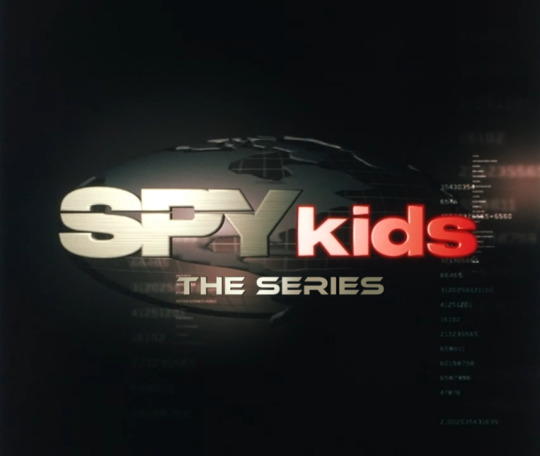
I also made more "captures" with different effects on different channels in different sizes, including "captures" of an ABC3 airing that I ended up not using, which you can also see below. The ABC, Toon Disney and ABC3 screenbugs are by RabbitFilmMaker, YourDailyDeviantArt and UnitedWorldMedia on Deviantart.


I have been thinking of ideas for more sets of fake screencaps, so let me know if you want me to "find" more screencaps. 😉
And let me know if you would've loved to have seen an earlier Spy Kids cartoon and what you think it would be like?
22 notes
·
View notes
Text
i know i made like a post two seconds ago but my adhd is in overdrive rn and i cant stop talking anyway i learn how to make fake screenshots. you know what i mean? like where you draw something to make it look like it came from a show??? i wanna do that. who got tutorials. i will restrain reblogging things for now so ppl can see this lol
40 notes
·
View notes